[Spring Security] Spring Security 6.x 버전 & OAuth2 실습 튜토리얼
🐥 OAuth2 시리즈
Spring Security, OAuth2 포스팅을 통해 개념에 대해 학습하였다. 이제 배운 내용을 바탕으로 직접 구현해보는 과정을 시작해보겠다. 이제 이것들을 직접 구현해보는 과정을 시작해보자.
🚀 프로젝트 생성하기
먼저 Spring Initializr을 사용해 프로젝트를 생성해보자.
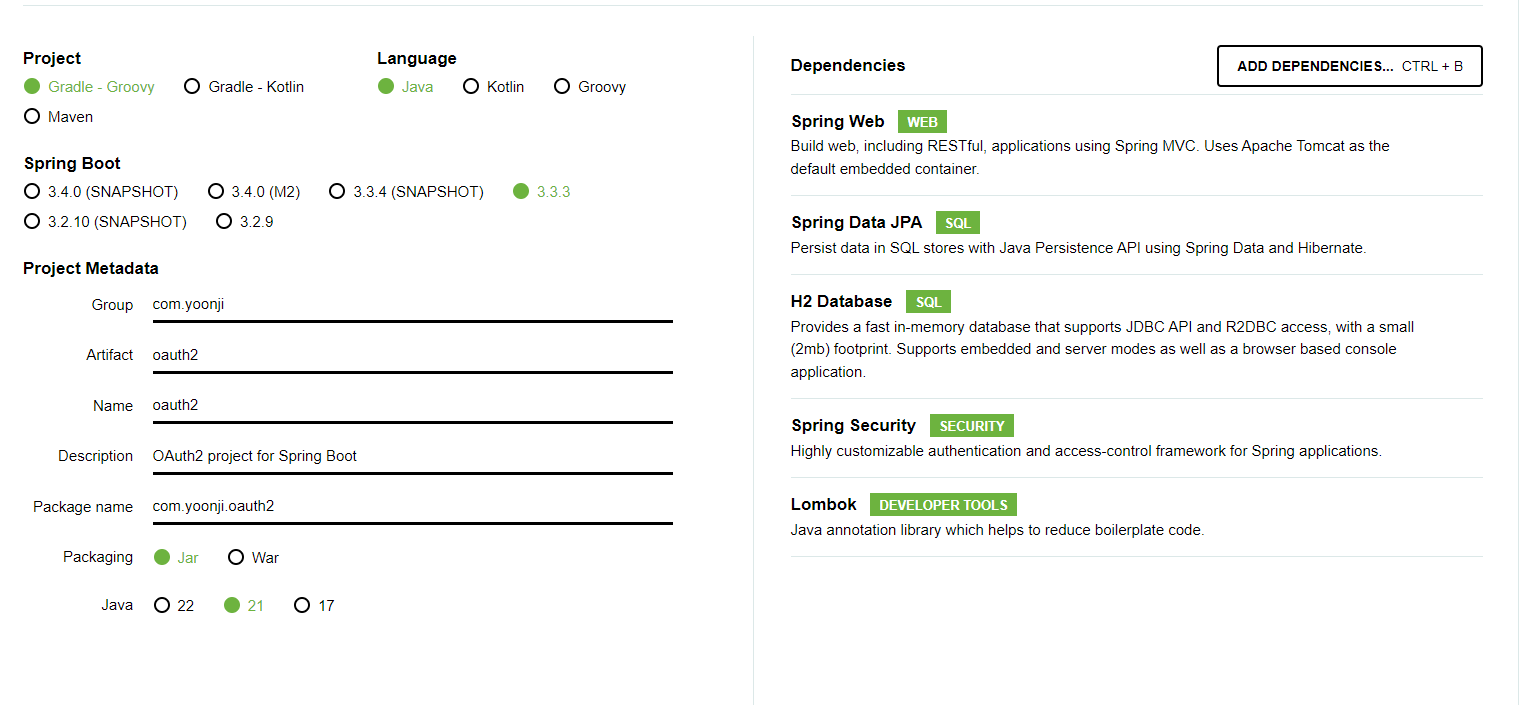
- 의존성: Web, JPA, H2, Lombok, Spring Security
- Group: com.yoonji (원하는 대로 설정)
- Articact: oauth2 (원하는 대로 설정)
- Java 버전: 선호하는 버전 선택
프로젝트를 생성하고 IDE를 통해 열어주면 된다.
이제 생성한 프로젝트가 정상적으로 실행되는지 확인해보자.
프로젝트 실행 후 브라우저에서 접속하면 Spring Security의 기본 로그인 페이지가 표시된다.

사진과 같은 화면이 뜨면 잘 동작하고 있는 거다.
🗃️ 데이터베이스 설정하기 (H2)
프로젝트에서 H2 버전을 확인해주고 https://www.h2database.com로 들어가서 해당 버전을 설치해주면 된다.
H2를 실행하는 방법은 참고자료가 많으므로 생략하겠다.
JDBC URL 부분을
처음에는 jdbc:h2:~/oauth2로 설정한 후 연결해준다.
그리고 ~/oauth2.mv.db 파일이 생성 됐는지 확인해 준다.
윈도우에서는 로컬디스크 > 사용자 > 사용자명 폴더에 들어가보면 된다.
이후로는 jdbc:h2:tcp://localhost/~/oauth2로 접속해주면 된다.
다음으로 application.yml 파일에 DB 정보를 입력해주자.
기존에 있던 application.properties 파일은 삭제해주고 application.yml을 생성해준다.
appliction.yml
1
2
3
4
5
6
7
8
9
10
11
12
13
14
15
16
spring:
  datasource:
    url: jdbc:h2:tcp://localhost/~/oauth2
    username: sa
    password:
    driver-class-name: org.h2.Driver
  jpa:
    hibernate:
      ddl-auto: update
    properties:
      hibernate:
       format_sql: true

logging.level:
  org.hibernate.SQL: debug
  org.springframework.security: debug
DB 연동을 확인하기 위해 간단한 User 엔티티와 리포지토리를 생성하고 테스트를 해보자.
회원 엔티티
1
2
3
4
5
6
7
8
9
10
11
12
13
14
15
16
17
18
@Entity
@Table(name = "users")
@NoArgsConstructor(access = AccessLevel.PROTECTED)
@Getter
public class User {
    @Id
    @GeneratedValue(strategy = GenerationType.IDENTITY)
    @Column(name = "user_id")
    private Long id;

    private String name;
    private String email;

    public User (String name, String email) {
        this.name = name;
        this.email = email;
    }
}
회원 리포지토리
1
2
public interface UserRepository extends JpaRepository<User, Long> {
}
회원 테스트
1
2
3
4
5
6
7
8
9
10
11
12
13
14
15
16
17
18
19
20
21
22
@SpringBootTest
@Transactional
class UserTest {

    @Autowired
    UserRepository userRepository;

    @Test
    public void testMember() throws Exception {
        User user = new User("하윤지", "ijnooyah@gmail.com");
        User savedUser = userRepository.save(user);

        User findUser = userRepository.findById(savedUser.getId())
                .orElseThrow(() -> new IllegalArgumentException("Member not found with id: " + savedUser.getId()));

        assertThat(findUser.getId()).isEqualTo(user.getId());
        assertThat(findUser.getName()).isEqualTo(user.getName());
        assertThat(findUser.getEmail()).isEqualTo(user.getEmail());

        assertThat(findUser).isEqualTo(user);
    }
}
테스트가 통과하면 DB 연동까지 완료된 것이다. 이제 이 프로젝트에서 사용할 도메인 모델을 알아보자.
📝 회원 엔티티 작성하기
JPA를 공부하는 것이 아니므로 최대한 간단한 도메인 모델을 설계했다.
참고로 간단한 구현을 위해 권한은 싱글로 설정했다. 다중권한은 추후 포스팅에서 다룰 생각이다.
회원 엔티티를 작성해보기 전에 스프링 부트 애플리케이션 클래스에 @EnableJpaAuditing 어노테이션을 추가해주자.
OAuth2Application.java
1
2
3
4
5
6
7
8
9
@SpringBootApplication
@EnableJpaAuditing
public class Oauth2Application {

	public static void main(String[] args) {
		SpringApplication.run(Oauth2Application.class, args);
	}

}
BaseTimeEntity.java
1
2
3
4
5
6
7
8
9
10
11
12
@Getter
@EntityListeners(AuditingEntityListener.class)
@MappedSuperclass
public abstract class BaseTimeEntity {

    @CreatedDate
    @Column(updatable = false)
    private LocalDateTime createdAt;

    @LastModifiedDate
    private LocalDateTime updatedAt;
}
User.java
1
2
3
4
5
6
7
8
9
10
11
12
13
14
15
16
17
18
19
20
21
22
23
24
25
26
27
28
29
30
31
32
33
34
35
36
37
38
39
40
41
42
43
44
45
46
47
48
@Entity
@Table(name = "users")
@NoArgsConstructor(access = AccessLevel.PROTECTED)
@Getter
public class User extends BaseTimeEntity {
    @Id
    @GeneratedValue(strategy = GenerationType.IDENTITY)
    @Column(name = "user_id")
    private Long id;

    private String nickname;
    private String email;
    private String picture;
    private String password;

    @Enumerated(EnumType.STRING)
    private ProviderType provider;

    @Enumerated(EnumType.STRING)
    private RoleType role;

    private boolean deleted;

    private LocalDateTime deletedAt;

    @Builder
    public User (String nickname, String email, String password, RoleType role, ProviderType provider, String picture, boolean deleted, PasswordEncoder passwordEncoder) {
        this.nickname = nickname;
        this.email = email;
        this.picture = picture;
        this.provider = provider;
        this.encodePassword(password, passwordEncoder);
        this.role = role;
        this.deleted = deleted;
    }

    private void encodePassword(String rawPassword, PasswordEncoder passwordEncoder) {
        if (rawPassword != null && !rawPassword.isEmpty()) {
            this.password = passwordEncoder.encode(rawPassword);
        }
    }

    public User update(String nickname, String picture) {
        this.nickname = nickname;
        this.picture = picture;
        return this;
    }
}
ProviderType.java
1
2
3
public enum ProviderType {
    LOCAL, GOOGLE, NAVER
}
RoleType.java
1
2
3
public enum RoleType {
    ROLE_USER, ROLE_GUEST
}
마지막으로 이메일을 통해 회원을 찾는 메서드도 UserRepository에 추가해주자.
UserRepository.java
1
2
3
public interface UserRepository extends JpaRepository<User, Long> {
    Optional<User> findByEmail(String email);
}
이것으로 기본적인 프로젝트 설정이 완료 되었다. 다음 포스팅에서 자체 로그인을 구현해보자.
Leave a comment