[Blog] 깃허브 블로그 댓글 giscus 적용하기
💎 들어가며
기존 블로그 댓글은 utterances를 적용했는데 giscus라는 댓글 시스템은 반응도 추가할 수 있다는 점에서 매력적으로 다가와 이것으로 바꾸기로 결정을 했다.
필자는 블로그는 블로그일뿐 이를 위해 새로운 언어나 기술을 깊게 파는 것은 주객전도라고 생각해 블로그에 원하는 기능을 구현하고 싶으면 서치나 AI의 도움을 받아서 하는 편이다.
이 블로그에는 다크모드 기능도 구현했기 때문에 다크모드 적용 시 giscus 테마도 다크모드로 변경하는 기능도 추가했다. (다크 모드는 외국 자료를 참고해서 구현했고 동적으로 프로필도 바꾸고 싶어서 AI도 참고해서 커스텀 했다. 근데 문제는 그 외국 자료가 뭐였는지 기억이 안난다. 추후 여유가 된다면 다크모드 적용법에 대해서도 포스팅해보겠다.)
🚀 giscus 적용하기
giscus를 적용하는 법은 매우 쉽다.
giscus 사이트에서 step-by-step으로 진행할 수 있다.
사이트에 적용법이 아주 잘 적혀있기 때문에 따라해주면 된다.
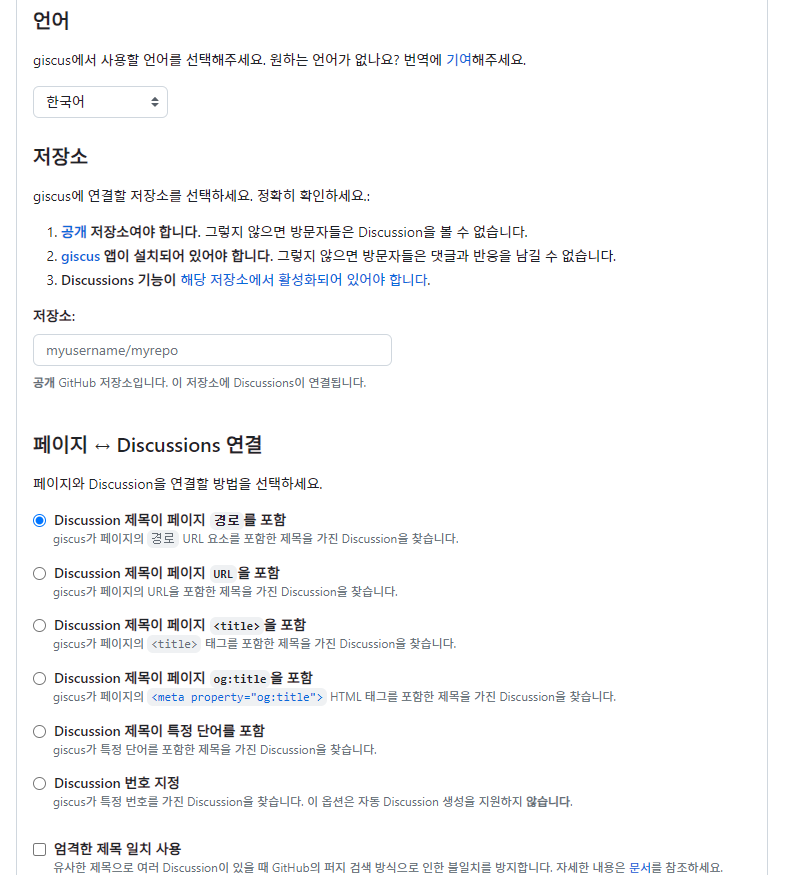
🏢 저장소 설정하기
일단 giscus를 연결할 저장소를 선택해야 하는데, 연결이 되려면 다음 조건을 만족해야 한다.
- 공개 저장소일 것
- giscus 앱이 설치되어 있을 것
- Discussions 기능이 활성화되어 있을 것
- 나는 내 블로그 저장소를 사용할거다. (ijnooyah.github.io)
- giscus 앱 설치는 사이트에서 제공하는 링크를 통해 설치해주면 된다.
- Discussion 활성화 또한 제공된 링크를 들어가보면 자세히 설명해준다.
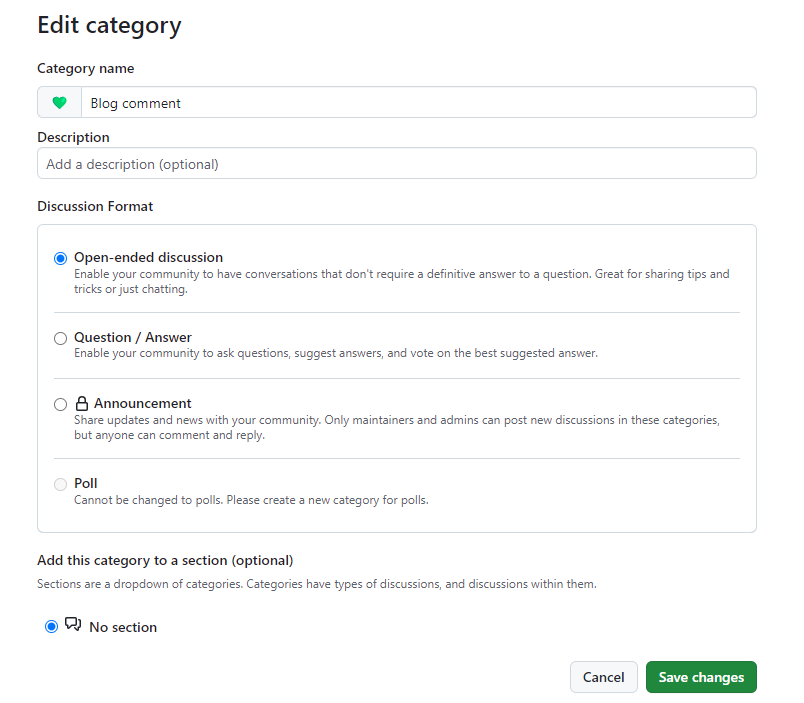
🔧 Discussions에 카테고리 추가하기
Discussions를 활성화 해주면 리포지토리에 Discussions 섹션이 생긴다.
필자는 Blog comment라는 카테고리를 만들어주었다.
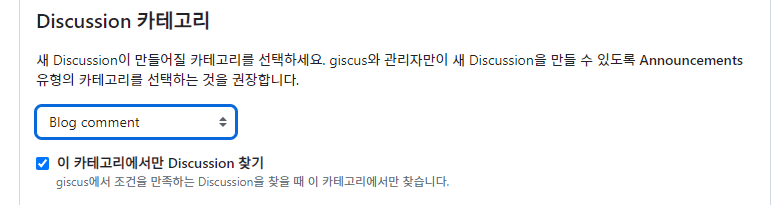
Discussion 카테고리에 아까 생성한 Blog comment를 설정해주고 이 카테고리에서만 찾기도 선택해주었다.
테마는 Github light로 설정해주었다.
그러면 giscus 사용에 아래와 같은 설정이 나온다.
1
2
3
4
5
6
7
8
9
10
11
12
13
14
15
<script src="https://giscus.app/client.js"
        data-repo="ijnooyah/ijnooyah.github.io"
        data-repo-id="R_kgDOMhLJ9Q"
        data-category="Blog comment"
        data-category-id="DIC_kwDOMhLJ9c4CiupE"
        data-mapping="pathname"
        data-strict="0"
        data-reactions-enabled="1"
        data-emit-metadata="0"
        data-input-position="bottom"
        data-theme="light"
        data-lang="ko"
        crossorigin="anonymous"
        async>
</script>
💻 블로그에 giscus 적용
이제 giscus를 블로그에 적용해보자.
_config.yml 파일에 다음 설정을 추가한다.
1
2
3
4
5
6
7
8
9
10
11
12
13
14
15
comments:
  provider: "giscus" # false (default), "disqus", "discourse", "facebook", "staticman", "staticman_v2", "utterances", "custom"
  giscus:
    data-repo: "ijnooyah/ijnooyah.github.io"
    data-repo-id: "R_kgDOMhLJ9Q"
    data-category: "Blog comment"
    data-category-id: "DIC_kwDOMhLJ9c4CiupE"
    data-mapping: "pathname"
    data-strict: "0"
    data-reactions-enabled: "1"
    data-emit-metadata: "0"
    data-input-position: "bottom"
    data-theme: "light"
    data-lang: "ko"
    crossorigin: "anonymous"
다음은 _includes/comments-providers 폴더에 giscus.html 파일을 생성하고 아래 코드를 붙여넣기 해준다.
1
2
3
4
5
6
7
8
9
10
11
12
13
14
15
16
17
18
19
20
21
22
23
24
25
26
27
<script>
'use strict';

(function () {
    var commentContainer = document.querySelector('#giscus-comments');

    if (!commentContainer) {
    return;
    }

    var script = document.createElement('script');
    script.setAttribute('src', 'https://giscus.app/client.js');
    script.setAttribute('data-repo', 'ijnooyah/ijnooyah.github.io');
    script.setAttribute('data-repo-id', 'R_kgDOMhLJ9Q');
    script.setAttribute('data-category', 'Blog comment');
    script.setAttribute('data-category-id', 'DIC_kwDOMhLJ9c4CiupE');
    script.setAttribute('data-mapping', 'pathname');
    script.setAttribute('data-strict', '0');
    script.setAttribute('data-reactions-enabled', '1');
    script.setAttribute('data-emit-metadata', '0');
    script.setAttribute('data-input-position', 'bottom');
    script.setAttribute('data-theme', 'light');
    script.setAttribute('data-lang', 'ko');
    script.setAttribute('crossorigin', 'anonymous');
    commentContainer.appendChild(script);
})();
</script>
_includes/comments-providers/scripts.html 파일에 다음 코드를 추가해준다.
1
2
3

{% when "giscus" %}
    {% include /comments-providers/giscus.html %}
_includes/comments.html 파일을 열어서 다음 코드를 추가해준다.
1
2
3
4

{% when "giscus" %}
    <h4 class="page__comments-title">{{ comments_label }}</h4>
    <section id="giscus-comments"></section>
이것으로 giscus 적용은 완료된 것이다.
🌓 giscus 테마 동적으로 변경하기
동적으로 변경하는 법은 giscus issues에서 찾아 적용했다. 코드는 필자의 블로그 다크모드에 맞게 적용되었다.
_incudes/head.html 파일의 스크립트를 다음과 같이수정했다.
1
2
3
4
5
6
7
8
9
10
11
12
13
14
15
16
17
18
19
20
21
22
23
24
25
26
27
28
29
30
31
function toggleTheme() {
    var node1 = document.getElementById('theme_source');
    var node2 = document.getElementById('theme_source_2');
    if(node1.getAttribute('rel') == 'stylesheet') {
    node1.setAttribute('rel', 'stylesheet alternate');
    node2.setAttribute('rel', 'stylesheet');
    sessionStorage.setItem('theme', 'dark');
    document.documentElement.setAttribute('data-theme', 'dark');
    changeGiscusTheme('dark_dimmed');
    } else {
    node2.setAttribute('rel', 'stylesheet alternate');
    node1.setAttribute('rel', 'stylesheet');
    sessionStorage.setItem('theme', 'light');
    document.documentElement.setAttribute('data-theme', 'light');
    changeGiscusTheme('light');
    }
}

function changeGiscusTheme(giscusTheme) {
    console.log('giscusTheme', giscusTheme)
    function sendMessage(message) {
    const iframe = document.querySelector('iframe.giscus-frame');
    if (!iframe) return;
    iframe.contentWindow.postMessage({ giscus: message }, 'https://giscus.app');
    }
    sendMessage({
    setConfig: {
        theme: giscusTheme,
    },
    });
}
이렇게 설정하면 다크모드 전환 시 giscus 테마도 함께 변경이 된다.
🎉 마치며
이상으로 giscus 적용 및 다크모드 연동 방법에 대해 알아보았다.
추가적인 질문이나 개선사항이 있다면 댓글로 남겨주길 바란다.
참고
Leave a comment