[Spring Security] OAuth2 실습 - Google 로그인 구현
🐥 OAuth2 시리즈
🌻 구글 서비스 등록하기
https://console.cloud.google.com/로 이동해서
새 프로젝트를 선택한다.
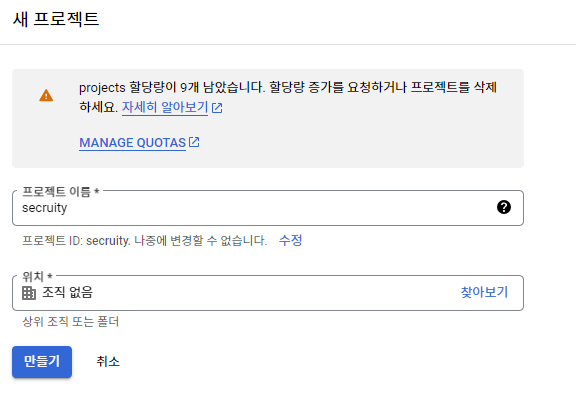
이름은 원하는 대로 지으면 된다.
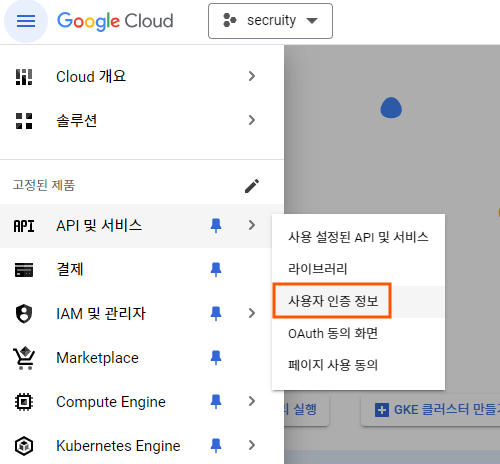
API 및 서비스 > 사용자 인증 정보로 이동한다.
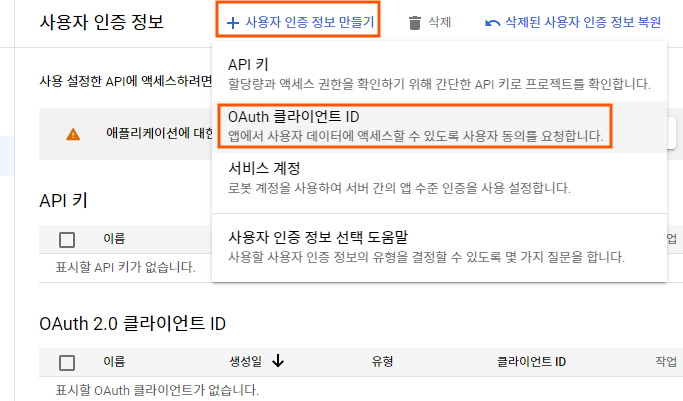
사용자 인증 정보 만들기 > OAuth 클라이언트 ID를 선택한다.
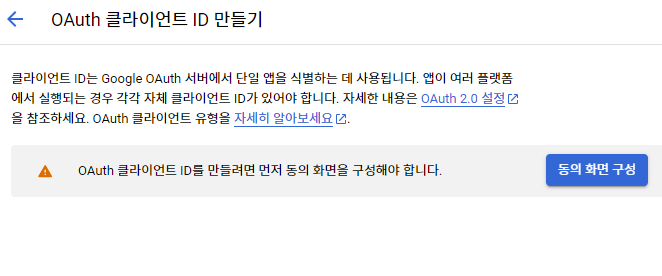
클라이언트 ID가 생성되기 전에 동의 화면 구성이 필요하므로 안내에 따라 동의 화면 구성을 클릭한다.
User Type은 외부를 선택해준다.
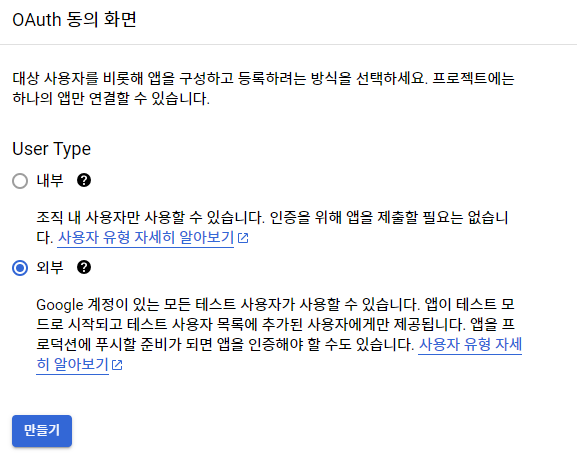
필수로 요구하는 입력칸만 채워주자.

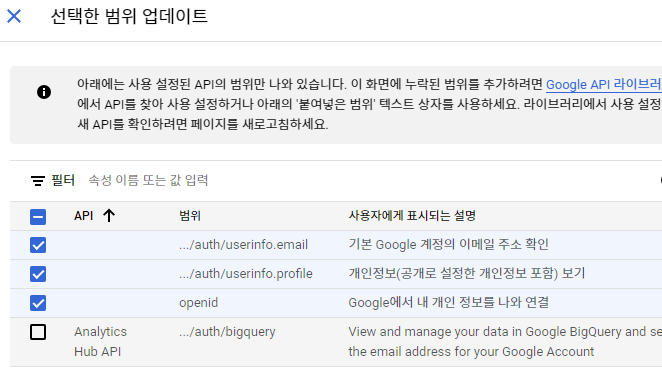
범위는 email, profile, openid 선택해주자.
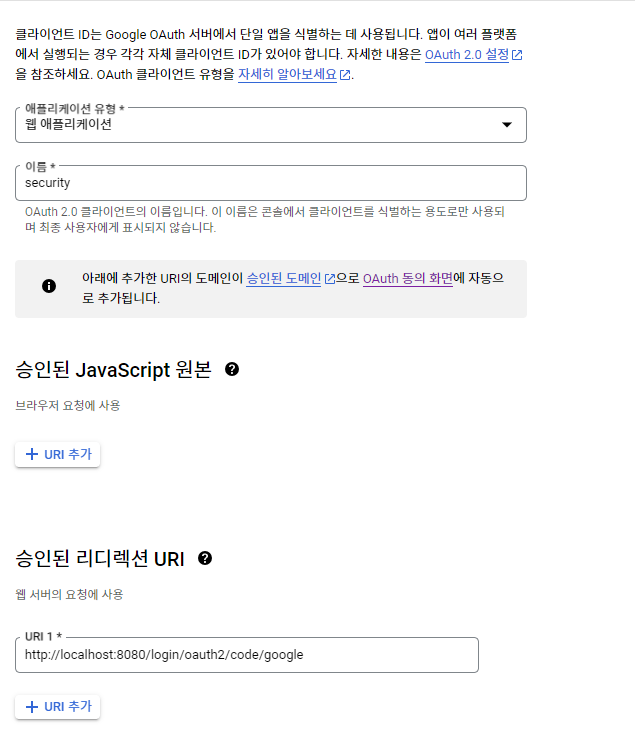
동의 화면 구성이 끝났으면 다시 사용자 인증 정보 > Oauth 클라이언트 ID로 들어간다.
애플리케이션 유형은 웹 애플리케이션을 선택한다. 이름은 원하는 대로 지어주자. 승인된 리디렉션 URI에 http://localhost:8080/login/oauth2/code/google를 추가해주자.
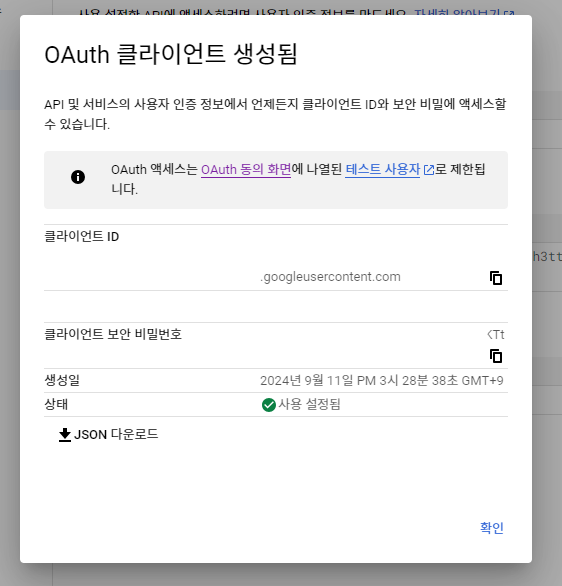
생성 버튼을 클릭하면 클라이언트 ID와 클라이언트 보안 비밀번호가 나온다. 이것을 저장해두자. (이정보는 다시 볼 수 있다.)
이제 클라이언트 ID와 보안 비밀번호를 프로젝트에 설정해보자.
application.yml이 있는 디렉토리에 application-oauth.yml 파일을 생성해주자.
application-oauth.yml
1
2
3
4
5
6
7
8
9
spring:
  security:
    oauth2:
      client:
        registration:
          google:
            client-id: my-client-id
            client-secret: my-client-secret
            scope: profile,email
scope를 따로 지정해주는 이유는 Google OAuth2의 기본값에는 openid가 포함되어 있어 OpenID Connect 기능을 활성화한다. 네이버 같은 비 OpenID Connect 플랫폼과의 통합을 위해 openid를 제외했다. (openid 포함할 경우 구글은 OidcUserService에서 따로 구현해줘야 한다.)
그리고 application.yml에 코드를 추가해준다.
application.yml
1
2
3
4
5
6
7
8
9
10
11
12
13
14
15
16
17
18
spring:
  datasource:
    url: jdbc:h2:tcp://localhost/~/oauth2
    username: sa
    password:
    driver-class-name: org.h2.Driver
  jpa:
    hibernate:
      ddl-auto: update
    properties:
      hibernate:
        format_sql: true
  profiles:
     include: oauth

logging.level:
  org.hibernate.SQL: debug
  org.springframework.security: debug
스프링 부트에서는 yml의 이름을 application-xxx.yml로 만들면 xxx라는 이름의 profile이 생성되어 이를 총해 관리할 수 있다. 즉, profile=xxx라는 식으로 호출하면 해당 yml 설정들을 가져올 수 있다.
클라이언트 ID와 보안 비밀번호가 노출되지 않기 위해 .gitignore에 application-oauth.yml를 추가해 깃허브에 올라가는걸 방지하겠다.
.gitignore
1
application-oauth.yml
🍈 구글 로그인 연동하기
OAuth2 로그인을 구현하기 위한 의존성을 추가해주자. build.gradle에 아래 코드를 추가해준다.
1
implementation 'org.springframework.boot:spring-boot-starter-oauth2-client'
SeucrityConfig에 코드를 추가해주자.
SecurityConfig
1
2
3
4
5
6
7
8
9
10
11
12
13
14
15
16
17
18
19
20
21
22
23
24
25
26
27
28
29
30
31
32
33
34
35
36
@Configuration
@EnableWebSecurity
@RequiredArgsConstructor
public class SecurityConfig {

    private final CustomOAuth2UserService customOAuth2UserService;

    @Bean
    public SecurityFilterChain securityFilterChain(HttpSecurity http) throws Exception {
        AuthenticationManagerBuilder authenticationManagerBuilder = http.getSharedObject(AuthenticationManagerBuilder.class);
        authenticationManagerBuilder.authenticationProvider(restAuthenticationProvider);
        AuthenticationManager authenticationManager = authenticationManagerBuilder.build();            // build() 는 최초 한번 만 호출해야 한다

        http
                .csrf(AbstractHttpConfigurer::disable)
                .authorizeHttpRequests(authorize -> authorize
                        .requestMatchers("/css/**", "/images/**", "/js/**", "/h2-console/**").permitAll()
                        .requestMatchers("/api/v1/auth/login", "/api/v1/auth/signup").permitAll()
                        .anyRequest().authenticated())
                .addFilterBefore(restAuthenticationFilter(http, authenticationManager), UsernamePasswordAuthenticationFilter.class)
                .authenticationManager(authenticationManager)
                .exceptionHandling(exception -> exception
                        .authenticationEntryPoint(new RestAuthenticationEntryPoint())
                        .accessDeniedHandler(new RestAccessDeniedHandler())
                )
                .oauth2Login(oauth2 -> oauth2
                        .userInfoEndpoint(userInfo -> userInfo
                                .userService(customOAuth2UserService))
                        .successHandler(((request, response, authentication) -> {
                            response.sendRedirect("/");
                        })) // 추가 코드
                )
        ;
        return http.build();
    }
}
CustomOAuth2UserService 클래스를 아직 만들지 않아서 컴파일 에러가 발생한다. 바로 다음에 만들거니 일단 작성해주면 된다.
userInfoEndpoint
인증된 최종 사용자에 대한 클레임(정보)을 제공하는 엔드포인트에 대한 설정을 구성한다.
userService
OAuth2 인증 후 제공 받은 사용자 정보를 커스텀할 서비스를 설정한다.
CustomOAuth2UserService를 만들기 전에 OAuth2User, UserDetails를 구현한 UserPrincipal을 만들자. 이 클래스는 CustomUserDetails 클래스도 대신하게 만들 것이다.
1
2
3
4
5
6
7
8
9
10
11
12
13
14
15
16
17
18
19
20
21
22
23
24
25
26
27
28
29
30
31
32
33
34
35
36
37
38
39
@Getter
public class UserPrincipal implements OAuth2User, UserDetails {

    private final Long id;
    private final String email;
    private final String password;
    private final String nickname;
    private final RoleType role;
    private final OAuth2User oAuth2User;

    public UserPrincipal(User user, OAuth2User oAuth2User) {
        this.id = user.getId();
        this.email = user.getEmail();
        this.password = user.getPassword();
        this.nickname = user.getNickname();
        this.role = user.getRole();
        this.oAuth2User = oAuth2User;
    }

    @Override
    public String getUsername() {
        return email;
    }

    @Override
    public Collection<? extends GrantedAuthority> getAuthorities() {
        return Collections.singletonList(new SimpleGrantedAuthority(role.name()));
    }

    @Override
    public Map<String, Object> getAttributes() {
        return oAuth2User.getAttributes();
    }

    @Override
    public String getName() {
        return oAuth2User.getName();
    }
}
RestAuthenticationSuccessHandler, RestAuthenticationProvider, CustomUserDetailsService에 CustomUserDetails를 사용하는 부분을 UserPrincipal로 변경해주자. 자세한 코드는 깃허브 전체 코드를 참고해주길 바란다.
이제 CustomOAuth2UserService를 만들자
1
2
3
4
5
6
7
8
9
10
11
12
13
14
15
16
17
18
19
20
21
22
23
24
25
26
27
28
29
30
31
32
33
34
@Service
@RequiredArgsConstructor
public class CustomOAuth2UserService implements OAuth2UserService<OAuth2UserRequest, OAuth2User> {

    private final UserRepository userRepository;

    @Override
    public OAuth2User loadUser(OAuth2UserRequest userRequest) throws OAuth2AuthenticationException {
        DefaultOAuth2UserService delegate = new DefaultOAuth2UserService();
        OAuth2User oAuth2User = delegate.loadUser(userRequest);

        OAuthAttributes oAuthAttributes = OAuthAttributes.of(userRequest, oAuth2User.getAttributes());

        User user = saveOrUpdate(oAuthAttributes);

        return new UserPrincipal(user, oAuth2User);
    }

    private User saveOrUpdate(OAuthAttributes oAuthAttributes) {
       User user = userRepository.findByEmail(oAuthAttributes.getEmail())
                .map(entity -> entity.update(oAuthAttributes.getNickname(), oAuthAttributes.getEmail()))
                .orElseGet(() -> User.builder()
                        .deleted(false)
                        .nickname(oAuthAttributes.getNickname())
                        .role(RoleType.ROLE_USER)
                        .provider(ProviderType.getProviderType(oAuthAttributes.getRegistrationId()))
                        .email(oAuthAttributes.getEmail())
                        .picture(oAuthAttributes.getPicture())
                        .build());

       return userRepository.save(user);
    }

}
oAuth2User.getAttributes()에서 얻어온 attributes들의 정보들에 우리가 원하는 이메일, 이름 등이 들어가 있다.
구글과 네이버가 제공하는 구조가 달라서 OAuth2Attributes DTO를 만들어서 각 구조에 맞게 변환하도록 했다.
1
2
3
4
5
6
7
8
9
10
11
12
13
14
15
16
17
18
19
20
21
22
23
24
25
26
27
28
29
30
31
32
33
34
35
36
37
@Getter
public class OAuthAttributes {
    private final Map<String, Object> attributes;
    private final String registrationId;
    private final String nameAttributeKey;
    private final String nickname;
    private final String email;
    private final String picture;

    @Builder
    public OAuthAttributes(Map<String, Object> attributes, String email, String nickname, String nameAttributeKey, String picture, String registrationId) {
        this.attributes = attributes;
        this.email = email;
        this.nickname = nickname;
        this.nameAttributeKey = nameAttributeKey;
        this.picture = picture;
        this.registrationId = registrationId;
    }

    public static OAuthAttributes of(OAuth2UserRequest userRequest, Map<String, Object> attributes) {
        String registrationId = userRequest.getClientRegistration().getRegistrationId();
        String userNameAttributeName = userRequest.getClientRegistration().getProviderDetails().getUserInfoEndpoint().getUserNameAttributeName();

        return ofGoogle(registrationId, userNameAttributeName, attributes);
    }

    private static OAuthAttributes ofGoogle(String registrationId, String userNameAttributeName, Map<String, Object> attributes) {
        return OAuthAttributes.builder()
                .nickname((String) attributes.get("name"))
                .email((String) attributes.get("email"))
                .picture((String) attributes.get("picture"))
                .attributes(attributes)
                .registrationId(registrationId)
                .nameAttributeKey(userNameAttributeName)
                .build();
    }
}
registrationId는 현재 로그인 진행중인 서비스를 구분하는 코드다. User엔티티의 provider 필드의 값이다.
UserNameAttributeName은 OAuth2 로그인 진행 시 키가 되는 필드값이다. PK와 같은 의미이다.
구글의 경우 기본적으로 코드를 지원하지만, 네이버 등은 기본 지원하지 않다. (구글의 기본 코드는 sub이다.)
프론트 단에 /oauth2/authorization/google를 추가해 테스트해보면 로그인이 잘 동작하는 걸 확인할 수 있을거다.
OAuth2를 위한 로그아웃은 따로 구현하지 않아도 자체 로그인 포스팅 때 구현했던 로그아웃 엔드포인트로 로그아웃이 성공적으로 이루어진다.
🐡 자신의 정보 조회하기 구현
UserController를 만들어준다.
1
2
3
4
5
6
7
8
9
10
11
12
13
14
@RestController
@RequestMapping("/api/v1/user")
@RequiredArgsConstructor
public class UserController {

    private final UserService userService;

    @GetMapping("")
    public ResponseEntity<UserResponse> getUser(@AuthenticationPrincipal UserPrincipal userPrincipal) {
        UserResponse userResponse = userService.getUser(userPrincipal);
        return ResponseEntity.ok(userResponse);
    }

}
UserService도 만들어 주자
1
2
3
4
5
6
7
8
9
10
11
12
13
14
15
16
17
@Service
@RequiredArgsConstructor
public class UserService {

    private final UserRepository userRepository;

    @Transactional(readOnly = true)
    public UserResponse getUser(UserPrincipal userPrincipal) {
        User findUser = userRepository.findByEmail(userPrincipal.getEmail()).orElseThrow(() -> new RuntimeException("찾을 수 없음"));
        return UserResponse.builder()
                .nickname(findUser.getNickname())
                .email(findUser.getEmail())
                .role(findUser.getRole().name())
                .build();
    }

}
소셜 로그인으로 정보 조회하는 것 역시 프론트 단을 따로 만들어서 테스트 해보면 잘 나오는 것을 확인할 수 있다. 자체 로그인에서 정보 조회하는 것은 포스트맨으로 테스트 해보도록 하자.
이것으로 Spring Security 6 버전을 사용해 소셜로그인 구현하는 기본 과정은 끝냈다. 다음 포스팅은 Naver로 소셜로그인을 구현해보도록 하자. 추후에는 Swagger를 통해 API 확인하는 것도 구현해볼 생각이다.
참고
Leave a comment